How to Fix Sedlauncher.exe High CPU Usage in Windows 10?
Sedlauncher.exe may be a program file that is bundled with the KB4023057 updated patch. Sedlauncher.exe ensures the method of changing the OS so it will run swimmingly. typically it happens that some candidates face the problem of Sedlauncher.exe high hardware usage.
How to Fix Sedlauncher.exe Hardware High Usage in Window 10?
Window ten performs well with safety. Besides the updated package of KB4023057. Here are some steps that assist you to induce obviating the matter. If you would like to disable the services of “Window remedy service” briefly then you'll use these strategies yet to stop your method of operating that accommodates your desires.
Method -1: To Disable Window Remedy Services.
Step 1: Firstly open “RUN” file by (Window + R).
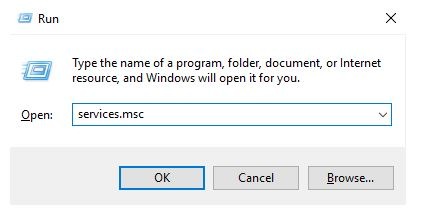
Step 2: After this, you may see a window therein kind “Services.msc” currently click ok.
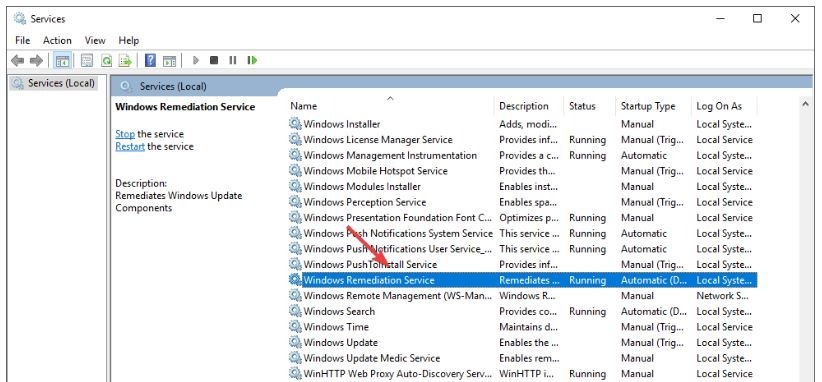
Step 3: Now you'll see several choices on your screen that page is thought as “Service Window”.
Step 4: In the service window notice “Window remedy Service”.
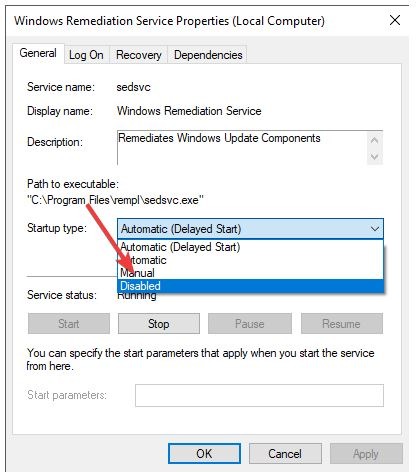
Step 5: “Window remedy Service Property” page on your screen. Click double on “Window remedy Service” and click on on the “Stop” button.
Step 6: On an equivalent page of “Window remedy Service Properties” click on the dropdown menu of “Startup Type”. currently therein dropdown menu, you’ll see “Disabled” choose that possibility.
Step 2: After choosing the “Disabled” click on the “Apply” possibility then click “Ok”.
Method -2: Delete REMPL Task Schedule.
- To open the “RUN” file. Type “taskschd.msc” within the window, click ok.
- “Task hardware (Local)” arrives on your screens at that time click on Microsoft > Window > REMPL folder. Click on the REMPL folder.
- Moving additional with the REMPL file. when choosing the REMPL file you’ll be able to see “Shall task”.
- On the “Shall task” page choose “Shall task” with right click then choose the choice “Delete”.
- At last, the deleting method page arrives on the screen simply click on “OK” within the prompt window for the ultimate method.
Method -3: Block Windows Remedy Service on Window Defender Firewall.
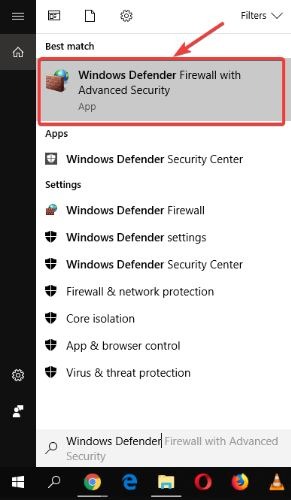
- As usual, you've got to open the “RUN” file. Type “wf.msc” and click on ok.
- “Window Defender Firewall with Advanced Security” page arrives on your screens.
- On your left facet, there are totally different choices click on “Outbound Rules” at that time click on “New Rules”.
- Now on the “New outward-bound Rule Wizard” page, there are different choices. Click on” Program” then hit the subsequent button.
- After that, a choice arrives. choose “The Program Path”.
- Type “cprogram filesrempl” then press browse.
- Moving ahead notice sedsvc.exe at that time double faucet on sedsvc.exe option.
- “New outward-bound Rules wizard” once more back to an equivalent page.
- Nothing to try to simply merely click on “Next”.
- On the new page yet there are numerous choices.
- Find “Block the connection” at that time and hit a subsequent button to manoeuvre forward.
- Then the “Profile” page is there on your screens.
- On that page, you’ll see three choices Domain, Private, and Public network.
- Select Domain, non-public and Public networks so new rules apply to them and so press the “Next” button.
- At the ultimate stage, kind sedsvc.exe within the window and press end for the submitting.
- Jhon Miller
- Last Update: 19 Jan 2024
Popular Blogs